Why Vlog Video Editing Is the Key to Growing Your Audience
Vlog video editing is the process of transforming raw footage from your daily life, thoughts, or experiences into a polished video that keeps viewers engaged from start to finish. Here's what it involves:
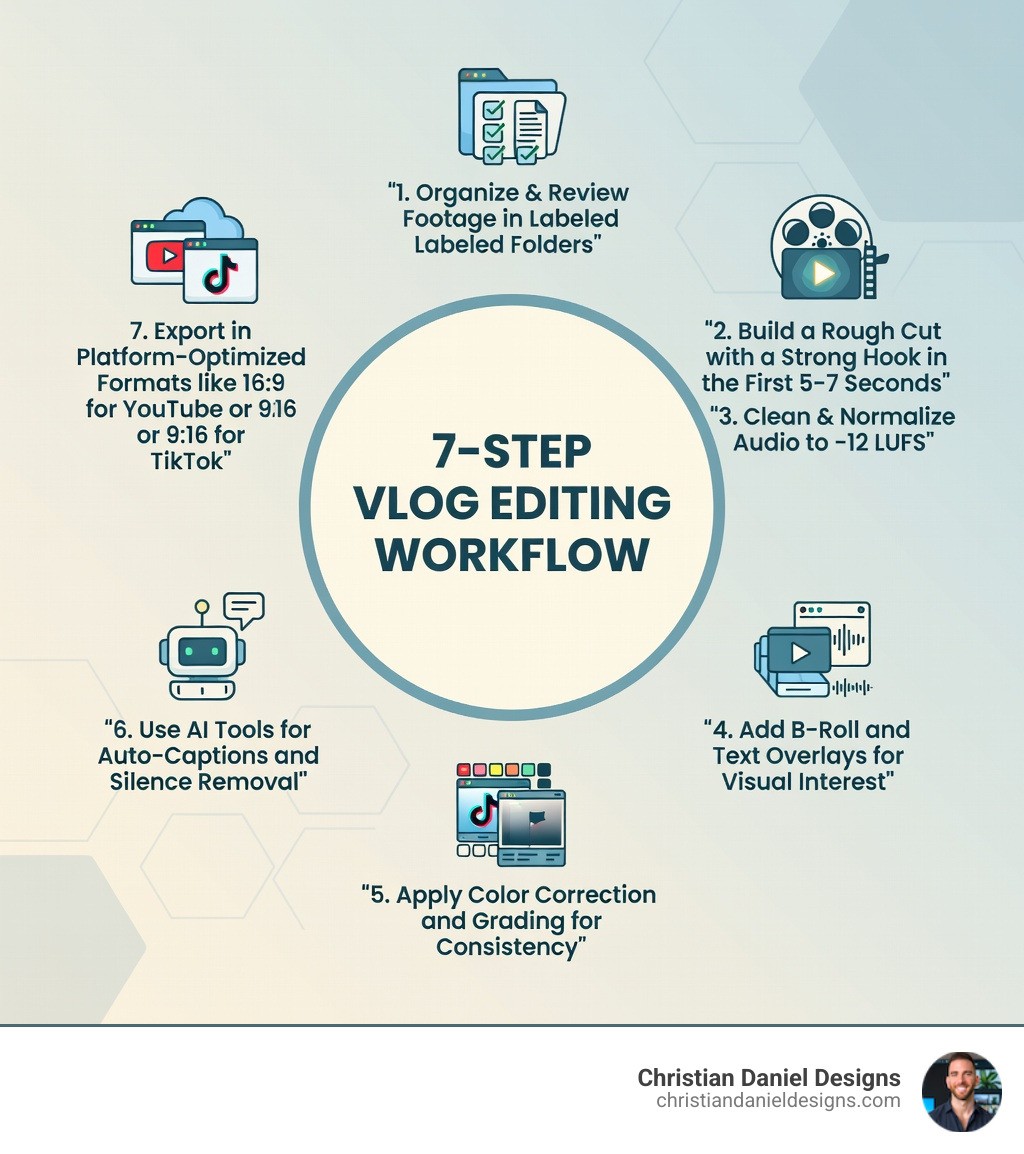
Quick Answer: The Essential Elements of Vlog Video Editing
Organizing footage - Sort clips into folders before you start cutting
Building a rough cut - Remove dead air and arrange your story with jump cuts
Fixing audio - Normalize levels, reduce noise, and add music
Adding visual polish - Insert B-roll, graphics, and text overlays
Color correction - Balance exposure and white balance across all clips
Platform optimization - Export in the right aspect ratio and resolution for YouTube, TikTok, or Instagram
Final review - Check pacing, audio sync, and calls-to-action before publishing
The truth is, great content can disappear into the void if the editing doesn't hold attention. Research shows that viewers forgive shaky camera work faster than harsh audio, and the most successful vloggers hook their audience in the first five to seven seconds.
Whether you're documenting your business journey, building a personal brand, or marketing your services, vlog editing is where raw moments become compelling stories.
According to multiple sources in the research, vlogs—short for "video blogs"—have evolved from YouTube's early days into a mainstream format across TikTok, Instagram Reels, and Facebook. The format works because it feels personal and authentic. But without smart editing, even the most genuine personality can lose viewers to poor pacing or muddy sound.
The editing process doesn't have to be complicated or time-consuming. A clear workflow makes all the difference.
I'm Christian Daniel, and I've spent over 20 years editing video content for brands like The Plaza Hotel, Park Hyatt Chicago, and National Geographic. My approach to vlog video editing focuses on efficiency, narrative clarity, and platform-specific optimization so your content performs wherever you publish it.
Steps 1-2: How I Master My vlog video editing Workflow
Before I even think about touching a timeline, I focus on the foundation. Efficient vlog video editing begins with organization. If I’m hunting for a specific clip of a sunset while I’m in the "creative flow," that flow is going to break immediately.
I start by building a standardized folder structure on my drive. I create "bins" or folders for Raw Footage, Audio (music and SFX), Graphics, and Exports. I use descriptive naming conventions, often starting with the date and a brief description, like 2025-05-10_NYC_Coffee_Shop_Broll. This prevents the "Clip 001" nightmare that plagues many beginners.
Once my files are set, I move into Step 2: Ingesting and Reviewing. I log my footage to identify the "selects"—the best takes that actually move the story forward. This is where I find my narrative arc. A good vlog isn't just a random collection of clips; it needs a beginning, middle, and end.
I always prioritize the first five to seven seconds. This is my "hook." I might lead with a quick question, a high-energy benefit, or a "payoff shot" (showing the end result of whatever I'm doing in the vlog). If I can't grab them in those first few seconds, they’re gone. As I build the rough cut, I am ruthless. I trim pauses, tangents, and duplicate lines. If you're struggling to keep up with the volume of footage, you might consider looking for a Freelance Video Editor New York to help manage the heavy lifting.
Why I Use Jump Cuts in vlog video editing
The jump cut is the bread and butter of modern vlog video editing. It’s the technique of cutting out sections of a single continuous shot to "jump" forward in time. While traditional filmmaking once viewed this as a mistake, vloggers like Emma Chamberlain turned it into an art form that defines the genre’s pacing.
I use jump cuts to remove "ums," "ahs," and long pauses where I’m just thinking. It keeps the energy high and the information flowing. To make these cuts feel more intentional and less jarring, I often use the "rule of thirds" to slightly reposition or zoom in on the subject between cuts. This makes the jump look like a deliberate camera change rather than a glitch. For those just starting out, tools like Clipchamp offer easy ways to trim and snap clips together to master this rhythmic style.
Steps 3-5: My Secrets for Audio, Visual Polish, and Color
If there is one thing I’ve learned in 20 years, it’s that audio is the unsung hero of video. Viewers will tolerate a grainy image, but they will click away instantly if the audio is piercing or muffled.
In Step 3, I focus on "Audio Mastery." I start by normalizing the volume so my dialogue consistently hits a target loudness—usually around -12 LUFS for YouTube. I use noise suppression to remove that annoying hum from an air conditioner or distant traffic. Then, I balance my music. A common mistake is letting the background track drown out the speech. I typically set my music beds 20-30dB below the dialogue peaks.
In Step 4, I move to "Visual Polish." This is where the video starts to feel "expensive." I add graphics that guide the eye, such as lower thirds to introduce people or locations. I also focus on B-roll—supplementary footage that illustrates what I’m talking about. If I mention a specific product, I don't just talk about it; I show a close-up of it.
Step 5 is Color. Many people confuse color correction with color grading, but they serve two very different purposes.
Feature | Color Correction | Color Grading |
|---|---|---|
Primary Goal | Fixing technical issues (exposure, white balance) | Creating a creative "look" or mood |
When to do it | First (essential) | Second (optional/stylistic) |
Focus | Realistic skin tones and natural whites | Cinematic tones, warmth, or "vibes" |
Example | Making a yellow-tinted indoor shot look natural | Adding a teal and orange tint for a summer feel |
I always start with primary correction to ensure skin tones look healthy and the shots match each other. A light touch is usually best for vlogs; you want the audience to notice the story, not the "grade."
Enhancing My vlog video editing with B-Roll and Graphics
To truly elevate my vlog video editing, I rely on J-cuts and L-cuts. A J-cut is when the audio of the next scene starts before the video does. An L-cut is the opposite—the audio of the current scene continues even after the video has changed to the next clip. These techniques make transitions feel seamless and professional.
I also love using text overlays to emphasize key points or jokes. Look at creators like Alix Earle; her use of quick on-screen text adds a layer of personality that feels like a conversation with the viewer. For businesses, this is also a great place to integrate AI Brand Video Generation techniques to ensure your branding—logos, fonts, and colors—remains consistent throughout the video.
Steps 6-7: How I Use AI and Platform Optimization
We live in an era where AI is a vlogger’s best friend. In Step 6, I leverage AI tools to speed up the "boring" parts of editing. AI silence removal can scan a 20-minute recording and automatically cut out every pause longer than three seconds, saving me an hour of manual trimming.
I also use AI for auto-captions. Subtitles are no longer optional; they make your content accessible to the deaf and hard-of-hearing community and allow people to watch your video in public without sound. Since "YouTuber" is now three times more popular than "Astronaut" as a dream job for kids, the competition is fierce—accessibility gives you the edge.
Finally, Step 7 is Platform Optimization. You cannot simply upload the same file to every site and expect it to work. Each platform has its own "vibe" and technical requirements.
YouTube: The home of long-form content. I export in 16:9 (widescreen), usually in 4K or 1080p using the H.264 codec. I also make sure to utilize the YouTube Partner Program features like end screens and cards.
TikTok & Instagram Reels: These require a 9:16 (vertical) aspect ratio. I aim for high-impact, edits under 60 seconds.
Thumbnails: Before I export, I use Microsoft Designer to create a custom thumbnail. A great vlog with a bad thumbnail is a ghost town.
I always perform a final review checklist: Is the audio synced? Is the pacing too slow? Is there a clear Call to Action (CTA) at the end? Once checked, I hit export.
Frequently Asked Questions about Vlog Editing
How long should my vlog be for YouTube vs TikTok?
For YouTube, the sweet spot is often between 8 to 15 minutes, as this allows for mid-roll ads and deeper storytelling, though some creators thrive with 30-minute deep dives. For TikTok and Instagram Reels, keep it under 60 seconds. The goal on short-form platforms is high retention and "loop-ability."
What is the best video editing software for beginners?
If you are just starting out, Clipchamp or iMovie are fantastic free options that cover the basics. For mobile-first creators, VlogU is a popular app with over 5 million downloads. If you want to go pro, Adobe Premiere Pro and DaVinci Resolve are the industry standards that I use for my high-end client work.
When is the right time for me to outsource my editing?
You should consider outsourcing when the time you spend editing is preventing you from filming new content or growing your business. If you find yourself sitting on weeks of unedited footage, it’s time to call in a professional. Outsourcing allows you to maintain a consistent posting schedule—which is the #1 factor in channel growth—without the burnout.
Conclusion
Mastering vlog video editing is a journey of finding your unique voice through the rhythm of the cut. Whether you are using jump cuts like a pro or perfecting your audio levels, every small tweak helps build a stronger connection with your audience.
At Christian Daniel Designs, I specialize in digital storytelling that drives real results. Based in NYC with deep roots in Queens and Manhattan, I offer a unique "under one roof" approach, providing both award-winning web design and high-end video editing services. If you're looking for help Finding a Professional NYC Video Editor who understands the nuances of brand voice and platform optimization, I'm here to help.
Ready to transform your raw footage into a high-performing asset? Start your next project with me today and let's tell your story the right way.